The following is a concise study guide on the requirements for receiving the JFR. It is the student’s responsibility to study and prepare themselves for flight training and their exams. Detailed explanations on the advanced JFRs (JFRt and JFRi) follow at the end.
Basic Flight Controls, and other Flight Systems
- Main Control stick; Responsible for Pitch, Roll of spacecraft, Forward/Back Causes Dive/Climb, Left/right causes roll left/right
- Pedals; Responsible for yaw of spacecraft; Left Pedal causes nose to turn left, right pedal causes nose to run right
- Throttle Control stick; Stick depressed all the way down maximum power to sublight thrusters; Pulled all the way up causes braking, certain spacecraft will deploy airbrakes in atmosphere to stop faster
- Hyperdrive Control Stick; Often situated opposite of sublight throttle, pulling the stick will engage the hyperdrive if a route is plotted.
- Main Displays; Can cycle through various configurations based on pilot preference. Largest display often used as targeting display during combat. Other displays include but not limited towards; shield power, weapon systems, spacial situation, communications display. Ship design dictates the number of displays and functions.
- Secondary Displays; Relay information such as speed, distance from target, altitude, gravitational forces, as well as basic warning systems.
- Sensors; Works in conjunction with displays, will relay any and all information necessary or capable of being detected. Includes electronic scanners, target capabilities, visual scanners.
All systems vary based on vessel design and purpose.
Safety Protocol
- Preflight checks should be performed before every flight, either by droids or manually.
- Permission to depart should be cleared before exiting hangar; preventing departing traffic from colliding with incoming traffic or vice versa.
- Arrival should be cleared with ground crews to insure clearing landing space.
- Sublight Ion Drives Should NOT be engaged while still in hangar space; Ion particles emitted are highly dangerous and radioactive.
- S-Foils should be secured and in locked position prior to landing.
- Weapon systems should also be disabled when entering any hangar space.
- Ships approaching each other on opposite vectors should pass by with their port sides closer to each other.
- A ship passing another, on the same vector should pass with their starboard side on the slower vessel’s port side.
- Smaller craft should make way for larger vessels.
Emergency Safety Procedures
- Activate distress beacon.
- Channel for assistance from any available craft (If capable or safe to do so)
- Hard landings should take place in as open of a space as possible
- Use the ship’s design to slow yourself as much as possible before making contact with ground
- S-foils should be in closed positions to prevent catching
- Upon landing, assess the situation and determine if the craft is a hazard or not
- Retrieve survival pack if needed
Tactical/Combat Flight
- Follow the Five Stages of Starfighter Combat as originally described by Adar Tallon
- Following the chain of command and only make decisions against it if confidence in leadership is lost
- Stick to your Wingman
- Be aware of enemies and their capabilities
- Double check identification codes
Maneuvers
Roll-off-the-top-A half loop, followed immediately by a half roll
Jinking- Random turns, dives, slips in an attempt to avoid an enemy from obtaining a solid lock
Corkscrew Avoid-A spiral maneuver used to continue in a specific heading while still evading
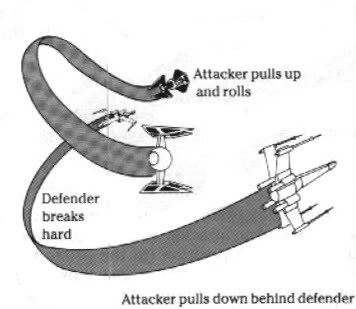
Reverse Throttle Hop– An offensive maneuver used to maintain an attacking position when a defender attempts to brake and turn away

The Trap-Using a wingman, allowing a target to chase one ship while the other wingman falls in behind
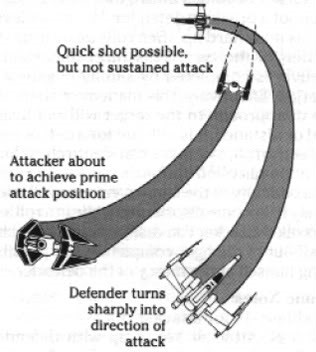
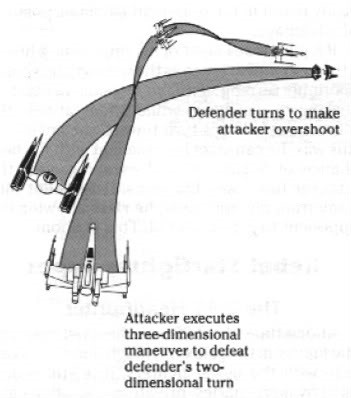
Breaking-Turning into the direction of an attack, attempting to cause the attacker to overshoot and lose the offensive position
Snap shot– A shot taken quickly as a target passes through your view. Often used to just disorient and cause a mistake and not to actually cause damage
Slip-jaws-A highly dangerous maneuver where two fighters, both being chased, cross paths, attempting to have the pursuers crash into each other
The Tallon Roll– Used to prevent yourself from overshooting when attacking. A Roll opposite the direction of a turn, in an attempt to position behind the defender
|
|
The Split- Allows two starfighters to inflict a substantial amount of damage on an unprepared capital ship. Two starfighters fly extremely close to one another as they approached a capital ship. The larger ship’s targeting computer will detect the two fighters as a single ship. At dangerously close range, the ships split. One fighter continues on a strafing run of the capital ship, while the second one, draws fire from the first. The starfighter that isn’t detected out of the two has an estimated five seconds before it is identified as a second ship. Five seconds of an attack run will cause serious damage to the larger ship, without its defenses endangering the pilot.
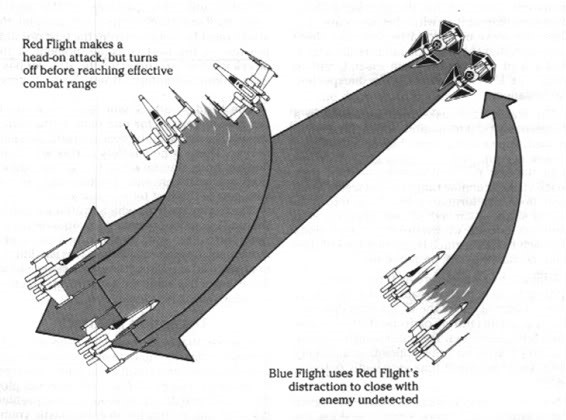
Feint and Backstab– One flight of fighters approach an enemy head on, but turn off before getting in weapon range. The enemy pursues. This allows a second flight to come up from a hidden vector and attack the distracted pursuers.
|
|
Wingman Flying
Every pilot who expects to fly in combat should become familiar with flying with a wingman. Flying with a wingman has two true purposes, increase offensive capabilities, increase defensive capabilities.
The wingman’s goal is to remain close to leader and warn of any immediate threats. The wingman needs to focus on both the leader and the rear. Two pilots together can warn each and watch each other’s blind spots.
Three standard Formations
Echelon – Offset diagonal. The wingman is typically positioned off the starboard side of the leader, with a varying amount of distance between. Typically, 3-4 ship lengths are common between the leader and the wingman.
Line abreast – Wing to wing, 90 degrees to each other. Again, the distance between can vary on the situation, but one never wants to be too far away or two close.
Stack – Wingman sits high vertically behind leader. As with the other two formations, the distance can vary, but with a high stack, a good distance is usually wanted, but not far enough away that you will be unable to assist each other if need be.
It’s important for pilots to get used to flying both positions, as during combat the roles may reverse at any moment.
Offensive Tactic-
Flying Wing – The leader essentially flies one on one against opponent, while the wingman keeps pace with the leader, keeping an eye out on the leader’s rear. This is best achieved from the echelon formation or a very low stack.
This tactic allows the wingman to be able to fire and assist whenever he has an open shot.
The wingman is exposed to any other ships typically, and only one set of guns is typically pressuring the attack. The wingman has to maintain focus on both following close behind the leader, the leader’s target, and their rear.
Best for pilots to be in the same type of craft so they can keep up with each other. If one vessel constantly has to push their engine to the max or constantly reign in the speed, then that’s another problem to have to deal with at the same time.
Loose Deuce – Same concept of the flying wing, but with much more spacing between the leader and wingman. This allows the wingman to exchange fire more easily towards opponents and can allow a fluid change of position from wingman to leader and vice versa if one pilot loses advantage attacking and another one gains the advantage.
This tactic means the enemy can be constantly kept under pressure. Less communication and discipline is required due to the spacing, the pilots are operating more independently and only need to communicate with change in positioning and other status updates.
This tactic can lead to vulnerabilities from the rear since the wingman is often kept at a greater distance, which requires more time for each other to cover each other. A high attacking opponent can get the jump on both pilots this way.
The Bracket – Pilots fly in the line abreast formation; one pilot draws away the opponent. When the opponent gives chase to the pilot, the pilot than draws the opponent back towards his wingman, the wingman lines up his attack on the opponent as the pilot loses the opponent with a maneuver. This tactic is highly effective when performed successfully but it’s extremely difficult to execute due to the coordination required. If the opponent is lured back too quickly, with the wingman unable to line up his shot, the opponent may have an attempt to take out the pilot he is following.
Defensive Tactics –
Defensive split – The two pilots split, causing the opponent to choose one target to attack. The pilot not be attacked and chased should work his way up and around for an attack on the opponent. This quickly turns the defensive maneuver into an offensive tactic, causing the attacker to get put on the defensive.
While generally very effective, this maneuver doesn’t work when the odds are even or unfavorable. If the two pilots split into opposite directions, if there are two attackers, depending on how they react can lead to this move being successful or not. If both attackers stay on one pilot, then the split can still be turned around and the pilot who is not being chased can attempt to swing their craft around and attack. If the attackers split and each pursue one pilot, then each pilot must engage in maneuvers to attempt to lose their respective attackers.
The Sandwich – The attacker makes a move on one of the two pilots, lead or wing. Whichever pilot is chosen by the attacker, turns away from their wingman. The other pilot, then follows their turn, hopefully causing the attacker to be pulled in between the two pilots. If successful, the attacking ship should end up between the two pilots, allowing the rear pilot an attacking advantage while the lead pilot attempts to avoid fire.
There are hundreds of different maneuvers a pair of pilots can employ together, and it’s impossible for pilots to truly prepare for every situation that might present itself to them, especially in combat. Knowing your ships capabilities, and your wingman’s capabilities gives you the highest chance of success in these situations. As always, a pilot should seek to avoid all actual combat whenever possible, but must be ready to strike hard and fast when necessary.
The Five Stages of Star Fighter Combat
- Detection
- Closing
- Attack
- Maneuver
- Disengagement
It is critical that any Jedi engaging in space combat be aware of all five stages and can understand the definitions of each. Detailed explanations on each stage can be found in the Archive entry “Starfighter Tactics.”
Jedi Flight Rating – Transport
The transport rating in the Jedi Flight certifications allows Jedi to pilot light freighters up to heavy transports. All of the above information pertains to the JFRt exam. The Transport rating focuses more heavily on maneuvering and the knowledge of cargo procedures. The following is a list of specifics that test for the JFRt.
- Route plotting and Hyperlane knowledge
- Ship maneuvering in congested areas
- External docking procedures
Jedi Flight Rating – Instructor
The instructor rating is the highest certification available under the Jedi Flight Rating system. This rating allows Jedi to instruct and test others for receiving their JFR. All of the above knowledge pertains to the JFRi exam. Both the JFRb and JFRt are required for the JFRi. Expert skill with all ships is expected with those testing for the JFRi as few subjects are off limits. The following is a list of topics covered not mentioned in above categories.
- Wing Commanding
- Flight Leadership and administrative duties.
- Flight instruction
- Battlefield movements